The Moti Mahal

Wolseley had no orders of what to do once he had the Mess House, so, “pointing to a very large and fine building to our left front, I said to my good cheery companion, Captain Irby – who laughed at everything – ‘You go and take it, whilst I take a place to our right.’ So Irby rallied his men and charged off to take the Tara wali Kothi or Observatory while Wolseley made for the Moti Mahal. At that moment he had no idea what this extensive place actually was nor that it joined the advanced position of the headquarters of his own battalion of the 90th in the Chattar Manzil.

The Moti Mahal or Pearl Palace, so named for its pearl-shaped domes, was commissioned by Nawab Sadaat Ali Khan. Situated on the right bank of the river and north-west of the Shah Najaf, it included two further structures that had been constructed by the Nawab’s son, Ghazi-ud-Din Haidar, the Mubarak Manzil and the Shah Manzil, both royal halls. Built supposedly for the entertainment of the Awadh royal family as a place where they could enjoy watching animal fights and birdwatching, the high towers were ideal for looking out into the countryside for any approach of enemies while the citadel-like appearance made it a formidable defensive position. It had initially been a part of the Kaiserbagh Complex.

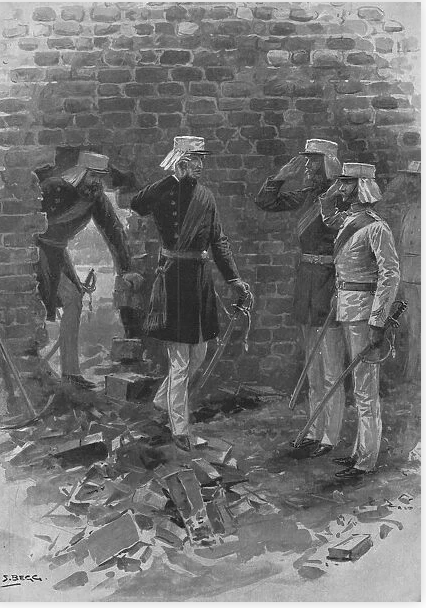
After traversing the distance to the walls of the palace under heavy fire from the rebels in the Kaiserbagh, Wolseley found the palace was surrounded by a high detached wall in front of the entrance constructed so that while one could ride around it but there was no way to see in. The rebels had been busy in their building works and had “built up the two entrances round this tambour into the palace square, the fresh brick working being well loopholed.” From these loopholes, the rebels met Wolseley and his men with a fusillade; as his men fell wounded, it was imperative to gain the upper hand. They succeeded in driving a few of the rebels back from the loopholes by firing through them but this only emboldened the rebels to crawl along the ground with their muskets loaded and shoot through the loophole again without showing themselves, on the off chance they might hit someone. Wolseley sent for some sappers – if he could not climb the wall or blast through it, then he would crawl under it. It was his servant, Andrews, who first spotted the sappers but they were going off in the wrong direction – he hastened after them, only to be shot for his troubles. Wolseley ran into the road and taking Andrews in his arms, dragged him to cover – as he did so, another shot burst from a loophole and the shot went straight through the wounded man. He left him to the care of Dr. Jackson and went back to the fight.
Suddenly standing before him was Thomas Henry Kavanagh – unsure who this strange man was he quickly explained himself and claimed he could find another way into the Moti Mahal as he knew the complex well. Unfortunately not as well as Wolseley had hoped; the second entrance was as blocked up as the first so there was nothing for it but to continue digging. He ran back to his men.
“As I approached, I caught sight of the soles of a pair of boots and the lower part of a man’s legs, the rest of his body being through the small hole just made, which others were still working to enlarge. I asked who he was, “Ensign Haig” was the answer. I have seen many a reckless deed done in action, but I never knew a more dare-devil exhibition of pluck than this was. In any other regiment this young ensign would have had the Victoria Cross, but to ask for the decoration was not the custom in the 90th Light Infantry.”
The hole grew bigger until it was finally large enough to admit the men access into the tambour. Wolseley took them immediately around one side of the open courtyard – on the other, the rebels continued to fire from the open doors and windows. As he moved along, he was greeted by a man brandishing a tulwar which nearly “shaved my head off” but Wolseley was quicker and avoided the blow.
To complicate matters, the rebels began to fire through small loopholes that had been pierced through the walls of the buildings they were hiding in – “I had several of these holes covered over with little baskets, so common in all native buildings, which well propped up from without with sticks prevented those inside from aiming well at us outside.”
Full into the fight, Woselely was suddenly surprised by an explosion on the opposite side of the courtyard – when the dust and smoke cleared he was astonished to see the breach full of British soldiers and at their head Captain Tinling of his regiment – it was the men from the Residency, who in a sortie had blown a mine which brought the palace wall down with a crash and joined Wolsely in clearing the Moti Mahal. The two armies had met at last. Within half an hour, they cleared the Moti Mahal.
Outram had not greatly extended his positions until he was sure the relieving force was at hand. While Sir Colin had worked his way towards him on the 16th, Outram had continued occupying buildings that lay in the direction of the advance. Watching the proceedings from the Chattar Manzil it soon became clear all that was left was the open ground between the Steam Engine House and the Moti Mahal.
Proceeding from the Moti Mahal, Kavanagh traversed over the Martin’s House where he met a soldier of the 64th from the Residency. In his company, Kavanagh ran the gauntlet with him to the Steam Engine House where he was greeted with some surprise by Sir James Outram. The honour of bringing the two armies together had been left to him alone.
“From the point now occupied, however, to the Moti Mahal, the most advanced position held by Sir Colin’s troops, about half a mile intervened; and the way from one place to the other was exposed to the enemy within easy musket shot… the risk did not prevent the two gallant generals and their staff from crossing the space to meet the Commander-in-Chief. They started — eight officers and one civilian. They were Outram, Havelock, Napier (now Lord Napier of Magdala), Vincent, Eyre, young Havelock (now Sir Henry Havelock), Dodgson, the Deputy Adjutant-General, the aide-de-camp Sitwell, the engineer Russell, and the gallant Kavanagh. They had not gone many paces before they were seen by the enemy, and the musketry fire from the Kaisarbagh redoubled. Napier was struck down, young Havelock was struck down, and Sitwell and Russell were struck down. Outram, Havelock, Eyre, Dodgson, and Kavanagh, alone reached the Moti Mahal uninjured.”
From the top of the Mess House, Norman could report to his commander that Outram and Havelock were indeed standing outside the western wall of the Pearl Palace. Some of Lennox’s sappers set to work and made the breach large enough for the two gentlemen to pass into the grounds – while Outram was still looking fit for a fight, Havelock on the other hand, was worn out and depressed. He was too weak to cross the breach himself and had to be lifted through it by Lieutenant Palliser and his faithful bugler, Dick Pearson of the 78th.
Inside the Moti Mahal, the party of soldiers were led by a “gigantic red-bearded officer” – Adrian Hope – and they flocked around Havelock. Soon after Hope Grant was able to congratulate him on being relieved and the men gave three cheers, Havelock’s breast heaved and his eyes filled with tears.
“Soldiers, I am happy to see you; soldiers, I am happy to think you have got into this place with a smaller loss than I had.” He brightened a little when Norman told him he was now a KCB.
With the firing from the Kaiserbagh to send them on their way, the party made their way to the Mess House where Sir Colin Campbell greeted them on the sloping grounds – a “happy meeting and a cordial shaking of hands took place.”
Arthur Moffatt Lang had been ordered to stay where he was and missed out on the fighting but he listened as cheers broke out, “from house to house, gun to gun, regiment to regiment, down the road, conveyed the news that the junction was effected and the Relief…had met Sir Colin. How we all did cheer! That night all the Gomati bank (right) was ours from Residency to Dilkusha.”

https://www.npg.org.uk/collections/search/portrait/mw08481/The-Relief-of-Lucknow-1857
Sources:
Blomfield, David, ed. Lahore to Lucknow: The Indian Mutiny Journal of Arthur Moffat Lang, 1st Lt., Bengal Engineers. London: Leo Cooper, 1992.
Cromb, James. The Highland Brigade: Its Battles and Its Heroes. Edited by David L. Cromb. Stirling: Eneas Mackay, 1902.
Ewart, John Alexander. The Story of a Soldier’s Life; or, Peace, War, and Mutiny. Vol. 2. London: Sampson Low, Marston, Searle, & Rivington, 1881.
Forbes-Mitchell, William. Reminiscences of the Great Mutiny 1857–59: Including the Relief, Siege, and Capture of Lucknow, and the Campaigns in Rohilcund and Oude. London: Macmillan and Co., 1893.
Goldsmid, F. J. James Outram: A Biography. Vol. 2. London: Smith, Elder, & Co., 1880. (Note: The first edition was published in 1880).
Grant, Hope. Incidents in the Sepoy War, 1857-58: Compiled from the Private Journals of General Sir Hope Grant. Edited by Henry Knollys. Edinburgh: William Blackwood and Sons, 1873.
Kavanagh, T. Henry. How I Won the Victoria Cross. London: Ward and Lock, 1860.
Maude, Francis Cornwallis. Memories of the Mutiny. Vol. 2. London: Remington & Co., 1894.
Roberts, Frederick Sleigh. Forty-One Years in India: From Subaltern to Commander-in-Chief. Vol. 1. London: Macmillan and Co., 1911.
Verney, Edmund Hope. The Shannon’s Brigade in India: Being some Account of Sir William Peel’s Naval Brigade in the Indian Campaign of 1857-1858. London: Saunders, Otley, and Co., 1862.
Verney, G. L. The Devil’s Wind: The Story of the Naval Brigade at Lucknow, from the Letters of Edmund Hope Verney and Other Papers Concerning the Enterprise of the Ship’s Company of H.M.S. Shannon in the Campaign in India, 1857-58. London: Hutchinson, 1956.
Wolseley, Garnet. The Story of a Soldier’s Life. Vol. 1. London: Archibald Constable & Co., 1903.
Wright, William, ed. Through the Indian Mutiny: The Memoirs of James Fairweather, 4th Punjab Infantry. Stroud, Gloucestershire: The History Press, 2011.
